My alternative fuel proposal is an existing idea that needs a fresh look, so here are my design ideas for getting it to work.
Lithium batteries have cost, resourcing and recycling issues. Sodium batteries may be better in future but progress is slow. We need climate change action urgently and we need to keep researching options. Straight up, this is a neglected and "fringe" option with a lot of challenges. Maybe it has a low chance of success. But it needs attention because if it works it has a lot of advantages. Starting with the possibility of converting existing
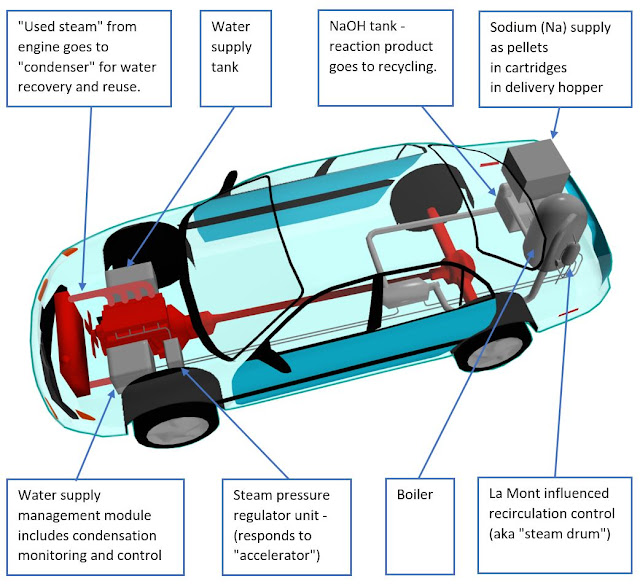
vehicles including converting their engines - to steam! The main emission is water vapour. The reaction product sodium hydroxide would
be recycled back into sodium metal by electrolysis. Therefore electricity is
the energy source for this "sodium cycle". A major challenge is to
achieve better efficiency with the electrolysis. Read on about the many other challenges and my suggested solutions.
When I retired from Manukau Institute of Technology in 2020, they gave me a present of a "Raspberry Pi" ultra micro computer. The "Pi" is well known to educators and engineers as a "robot brain" device. This however is the latest version 4 which with 4 cores and 8 Gb of RAM can take on the "mini server" role. I therefore set out to migrate this website on to the Pi. It was on a PC with some green quality because it was recovered from recycled parts - but this PC idled at 40 W power consumption, and Pi idles at 4 W. "Idle" is relevant because websites like this typically have only small bursts at the moment of visitor connection with little or no load while a visitor reads a downloaded web page.
The Pi is small enough to hold within the palm of my hand.
In this photo I have created my own enclosure for it adapting a plastic container and adding a small cooling fan.
This website was a challenging candidate for migration to Pi because the tech was "Microsoft WebForms dotNet Framework" which is very much Windows tech. In programming terms this this about the most distant we can get from Pi and its Linux operating system.
About which Linux. The default Pi Linux is "Raspbian" which is optimised for the "robot brain" role. I use the optional alternative Ubuntu 64 bit which is more suitable for the "mini-server" role.
My old website had a "Microsoft SQL Server" database. Microsoft has recently released a version that can run on Linux including Ubuntu. I could not install it and on much searching discovered that it is incompatible with the "RISC ARM-64" CPU silicon chip at the centre of the Pi. The fix for that was a database migration to "Sqlite".
I went at first with using "mono". "mono" is an system that duplicates most of the functionality of "dotNet Framework" for Linux and some other non-Windows systems. This was off to a good start with minor code changes but to get more advanced details working needed more work. I could not get "Session" to work at all and I ended up needing to code an equivalent from the fundamental base of Session cookies. I also found the configuration and setup on Ubuntu to be hard work. I had fastcgi working for about a month then it stopped and I was unable to recover it. I switched to the simpler xsp4 which comes with warnings about it being a lesser test system although it worked well for me. After about 2 months, fastcgi mysteriously started working again, but by then I had moved to "dotNet Core 5".
My other programming is all on the latest "dotNet Core 5" and most of my programming community has also moved on to that leaving only a small population interested in the framework version of mono. I therefore took on the next level challenge and "got current". Fortunately my website makes only limited use of "WebForms" which are not supported in "dotNet Core 5". I was able to replace WebForms with "Razor Pages" which have a similar arrangement where we build 1 web page as 2 files: a "client side" page based on html, and a "server side code behind" page in the "C#" ( c-sharp) programming language.
I tried a little trick that worked, which was to keep the old aspx extension as part of the new name. e.g. an old page with files: "NoticeEdit.aspx" and "NoticeEdit.aspx.cs" becomes new files: "NoticeEdit.aspx.cshtml" and "NoticeEdit.aspx.cshtml.cs". The extensions "cshtml" and ".cs" get hidden under "dotNet Core 5" so the effective names are the same as before and the old menus and links still work.
From my experience, "dotNet Core 5" is smooth and easy to deploy on Linux. The extra programming work for migration is well rewarded by having a good, reliable deployment and run experience.
Serving video across the internet is high demand for both a mini-server and its programmer (me). So I had to try it. Most videos on this website are relayed from Youtube or Vimeo. Here are 2 of substantial size, setup to play direct from the Pi.
(1) getting these to play and (2) being able to navigate the timeline to play any part of it, aka "scrubbing", are impressive - if they work - you can test this for yourself.
Experimenting here is done with a Vodafone VFD-300 which appears to be a typical example of low cost smartphones. Vodafone have now replaced this model with the VFD-320 which appears to be physically similar but I have not had the opportunity to test one yet.
The VFD-300 can be converted to an effective Infra-Red camera by removing the "IR-cut filter" The IR-cut filter is a thin glass or brittle plastic object at the back of the lens which blocks infra-red light.
Remove the device back cover.
Then take out screws to remove an internal plastic cover.
The camera is centre-top.
The lens unscrews.
Hint: Count how many turns or part-turns to remove the lens. It will need to go back the same way to have focus. I counted 10 part turns which approx translates to 3 full turns.
Lens with IR-cut filter is on the left.
At some angles, reflected light looks red.
Lens on the right has had the IR-cut filter removed.
The IR-cut filter breaks easily by a light touch with a sharp metal object. Best to do this working in an open plastic container to catch the resulting very small pieces of broken .. glass? We can then clean it out with a wet paper towel or similar.
Removing the IR-cut filter makes a big difference in camera behaviour. Interesting to see here that a dark red chair becomes one of the brightest objects in infra-red.
A modest IR LED light source gives IR vision up to 8m
The camera has a low light setting which appears to give a slow shutter speed, resulting in motion blur. I intend not to use that because of monitoring animals like rats where we do not want motion blur. Also we are likely to monitor at close distances of 1m to 2m and it looks like our infra-red lighting levels will be good enough to work well at the "normal" setting. With enough headroom to be able to run a lower power LED infra red light source.
Here for interest is the same shot taken on the low light setting.
The camera gains increased sensitivity for low levels of visible light, although with false colour in the image. I had 2 x VFD-300 phones available last night, one with this mod and one with a "normal" camera. So I could take photos of a back yard in fading evening light, both ways.
This relates to efforts to save NZ native bird life from introduced predators like rats, possums and stoats which are a mis-match to our ecology.
There is a story going around the internet about snake robots. Here is the wikipedia version:
Also, snakebots can be used by animal control officers to subdue rabid or invasive creatures. Raccoons, barn cats, and large rodents typically respond to the snakebot's presence with attacks upon which the snakebot will emit an electrical shock and paralyze the aggressor. (retrieved from: https://en.wikipedia.org/wiki/Snakebot)
"snakebots can be used by animal control officers" Snake Robots are highly experimental and there may be only 10 in the world at the time of writing this - March 2019. They are not readily available to anyone except researchers and advanced hobbyists who build their own.
"(pests) respond to the snakebot's presence with attacks" If there is any truth in this then it would give snake robots an important pest control "lure" advantage. Therefore IMO it is worth finding out.
"emit an electrical shock and paralyze the aggressor" Electric shock is used in some commercially sold rat traps so this may work.
Focussing on (2), can a snake robot attract pest attention? If this is an instinct for some animals, would they still have it after many generations in NZ with no contact with snakes? I am a practical person so late at night on the 16 Mar 2019, I was out in the bush with my snake robot and equipment to try to find out.
In brief: The result is inconclusive. No predators attracted but I was only able to get the snake robot running alone for 10 minutes.
Lots of problem-solving to get out there. It was a close decision to go ahead but it was good value as discovery of what the snake robot needs to do better.
Note - I am describing and naming products that worked well in this particular situation. I have no promo connection with their makers or sellers.
Where to put the Snake Robot?
I had access to a bush area north of Auckland. I found a dried up creek with a waterhole and I selected an earth bank above that as a good area. Later I got advice from a local farm manager who recommended the same place. I placed a "Trail Camera" there 2 weeks before the grand experiment and results from that showed possum activity. Here is the reconnaissance highlights video:
A Snake Robot needs Snake Skin
Showing off the snake workings has been good value for public demos, but it will not do for out in the bush. I asked my daughters about hosiery and they recommended heavy opaque pantyhose. Well done! I can report that "Columbine 50 denier (heavy) opaque pantyhose Mocha small" that I bought from the Farmers Trading Company was good value for both flexibility and protection.
Monitoring Cameras
The "TechView 720P Outdoor Trail Camera" bought from "JayCar" - NZ 169.00 Cat.no: QC8041 - had a success rate of 19 out of 26 trigger events in 2 weeks, ie 73 percent which is better than I expected. I set up its timer to record from 6:30pm to 6:30am ie at night with a little evening and morning. The highlights video above is from this camera.
I bought and assembled an "Infra-Red Spotlight Kit" NZD 10.14 on special from "JayCar". Cat.no: KG9068. I modified it to run from a 5V powerbank through a boost module giving 9V. That needed use of 47 ohm resistors instead of the supplied 220 ohm. This gave me the opportunity to measure the efficiency of a boost module. Input is 5V x 1.1 A = 5.5W. Output running the 32 leds is 9V x 0.5A = 4.5 W. Efficiency = 4.5/5.5 = 0.82 (82 percent).
This "spotlight" did well at adding more infra red illumination, especially for the next item.
I dragged out an old Sony Handicam Video Camera of circa 2001 vintage. At that time Sony used CCD sensors which have good infra-red sensitivity and they had a "Nightshot" setting including an infra-red spotlight. Similar result to a trail camera but with the advantage of an optical zoom lens. I positioned myself 25m away and used this as my night vision to watch the test site.
SmartPhone as infrared monitoring camera?
In earlier trials at home I found 2 x smartphones that appeared to have some infrared sensitivity. This suggested the possibility of a wildlife monitoring camera with remote monitoring capability. However in these real bush conditions they were not sensitive enough. I have since tried finding and removing the "infra red cut filter" on an old phone but that only resulted in my breaking the camera. [UPDATE 30 Mar 2019 - tried this again on a Vodafone VFD-300 - found the infra-red-cut-filter in the back of the lens, broke it out and ... success - it is now an effective infra red camera. It has also gained increased sensitivity as a visible light camera although with false colours. New blog post about this: http://hitechfromlotech.blogspot.com/2019/03/smartphone-vfd-300-as-infra-red-camera.html]
Needs remote control
I was watching from behind a large tree about 25m away from the snake. That was too far for remote control by bluetooth which was losing contact at only about 7m so I had the snake idling which gives a small "jiggle" movement. On the TODO list is to combine our open source software projects "XMSnakeRobot" and "XMRemoteRobot" to give long distance remote control over mobile data. As in run the snake robot and cameras from the farm house, which would get me well away from target animals which may want to avoid me. I have made good progress on that in the last week.
Snake Robot needs an external power supply for this experiment
The snake robot runs on internal model aircraft lithium batteries which give it independent untethered movement - this seems to be a rare capability for existing snake robots. Sessions are limited to about 45 min indoors."In the wild" it only ran 10 min before the back battery ran out - I think the tail hit some real life outdoor resistance like digging into the dirt. I did try running from a "powerbank" but the current draw had peaks that were too high, often triggering the powerbank cutout. On the TODO list is to try running from 2 x powerbanks which may work because the front and rear halves of this snake robot are powered separately.
Photos
Target area with trail camera:
Snake Robot setup as seen by the trail camera
"Oldie but a goodie" - old Sony Handicam has infrared "nightshot".
John Calder (author), with snake robot and important support equipment, navigating past cattle.
Update - 15 May 2023 - NASA is working on snake robots. They achieve movement with Archimedes screws. Excellent idea!
My common robotics architecture is: Android Smartphone in the role of "Robot Brain" communicating via Bluetooth to Arduino MicroControllers in the role of "Spinal Cord".
I have done some experimentation with a "Raspberry Pi Zero" as an alternative "Robot Brain" and I revisited that today. I have setup and run the "Pi" for remote-control with VNC using "Pi Bakery": https://www.pibakery.org/ which I have found to be excellent value. "Pi Bakery" installs "Rasbian" which is "Linux Debian" customised for "Pi". "Pi Bakery" includes additional customisation to get Pi to begin running by remote-control over WiFi or over a USB cable. No screen or keyboard required - Pi borrows your computer or laptop screen, mouse and keyboard.
Today started well. I ran my project "XMRemoteMonitor" which is a wildlife or security camera web app. https://github.com/manukautech/XMRemoteMonitor
The functionality is all in the web app so no installation needed. I only needed to visit my website with the built in "Chromium" browser. This does need to access the device camera. I had an expensive Pi special camera plugged in but the Web App could not find that. Then I plugged in an old general purpose Microsoft webcam from one of my boxes of old leftover tech and that worked including automatic plug-and-play recognition. All good so far, acting like any other device. The Rasbian desktop even gives me a Windows-like experience.
But then the Pi only took 27 webcam photos over about 5 min before completely freezing up. The screen was still visible and connecting via VNC but all controls were frozen. During that 5min I did get readings of 0.29 and 0.30 Amp for the current drain. This is similar to smartphone current draw when they run the same app. As a mostly Windows practitioner I have Linux friends teasing me about Windows freezing. Well! It appears Linux can do that too!
This gives me an idea for my next Pi trial. Install "Windows 10 IOT" which is a lightweight Windows 10 for small devices like the Raspberry Pi. Then run the same web app - will it go better?
Results in the web app:
Setup. The Raspberry Pi Zero is the small green circuit board sitting on a white powerbank. Pi has 2 x micro USB ports. The left USB is fully functional and I have plugged the webcam into it with an adapter. The right USB is for power supply only.
I am getting more and more interested in doing interesting things with low power rockets. It is education and robotics that led me to a rocket interest. My rocket-for-education design that started with a rocket motor of "E" power rating is now reducing and I am now designing for "B" power. The aims being:
to be able to launch from school grounds
to take sensor readings
to do all-electric recovery.
I think even small rockets need to detect apogee with an altimeter to control recovery and the electronics involved are now small enough and low cost enough to work as part of a student project. The video shows - shock! horror! - a water rocket for prototype testing of an altimeter circuit. That does achieve proof of concept although I am having challenges with lightweight battery versus relatively power-hungry bluetooth module.
Trying out some rocket design ideas eg air brakes by launching a test body with a catapault to get a close-up look at apogee behaviour. The air brakes do not deploy but I get some other good learning value. The tail fins seem to be remarkably effective at low speeds as in too effective. They are pointing the body nose down very soon after apogee which keeps the air flow going past the body from nose to rear which keeps the air brakes closed. I was hoping for some random airflow to catch the air brakes and help them open.